
In Home Automation systems you will use TLS Certificates for multiple purposes.
- Accessing the web interface of your setup over the internet
- Securing the communication between your connected devices inside your setup
The goal of this exercise is to learn how to create your own TLS Certification. If you are not quite familiar with TLS certificates please read this first – https://programozdazotthonod.hu/security/
openSSL
To create a TLS certification we will use a tool called opeSSL. You can install it on your Linux computer/raspberry by using apt-get install openssl For Windows precompiled binaries can be found here: https://wiki.openssl.org/index.php/Binaries (these are 3rd party compilations, rather use openSSL on your raspberry if possible.)
Generating a private keyopenssl req -newkey rsa:2048 -nodes -keyout privatekey.key
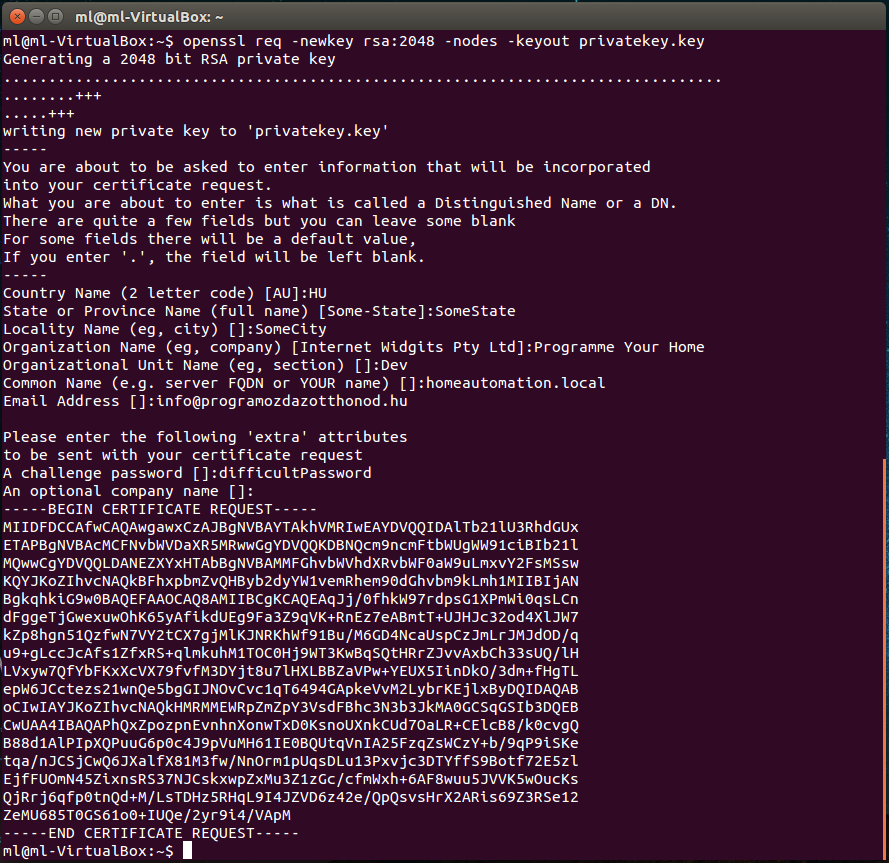
- -newkey : guess what 🙂
- rsa:2048 : The encryption type your key will implement is a 2048 bit long Rivest-Shamir-Adleman algorithm. If you’re interested you can find more info here: https://simple.wikipedia.org/wiki/RSA_algorithm Let’s just agree to use this, usually this is totally fine.
- -nodes : it means that we are not going to encrypt the key itself so you will need to take special attention not to share it with anyone. Other options are for example -des or -des3 where you password protect the key itself. Again: if you keep the key securely it doesn’t matter.
- -keyout filename : this is the file that will store your generated key
- You will be prompted to enter some information:
- Organization Name : whatever
- Organizational Unit Name : whatever
- Locality Name : whatever, like a city
- State/Region/Province : whatever
- Country Code : 2 letter country code
- Email Address : your email address
- Challange Password: the password to the key itself
Now you have two options
- Generate a Self-signed Certificate – easiest way but if you plan to use this Certificate to access the web interface of your home automation setup then your browser will complain all the time that it is not trustworthy. I think on Apple devices you won’t be able to even open the page. This is great if you plan to use this Certificate to secure the communication inside your home automation network
- Let’s Encrypt – signing a certificate by a commercial Certification Authority is actually quite costly so you do not necessarily want to do that. But not when using the services by Let’s Encrypt. This service has been created with the support of major internet companies with the goal of making the internet a more secure place. The whole process of creating a properly signed certificate and setting it in Home Assistant for example can be found here: https://www.home-assistant.io/docs/ecosystem/certificates/tls_self_signed_certificate/ We are not discussing more details related to the Let’s Encrypt topic now.
Generating a Self-signed Certificate
openssl req -key privatekey.key -new -x509 -days 1825 -out signedcert.crt

- -key privatekey.key : make sure that here you refer to the key you have created in the previous step
- -new : because of this parameter text input fields will appear that you need to fill with attention!
- FQDN or Fully Qualified Domain Name : if you remember from the TLS discussion the main goal of the Certification is to create the logical link between the Public Key and the Entity it belongs to. The FQDN you provide here will be checked when the client side receives this certification and will give an error if it doesn’t match the real host name. For example if the host name of your raspberry where you plan to use this Certification is myServer but in the FQDN field you wrote “raspberry” then it will be a problem for you. It needs especial caution when using docker to run an MQTT broker for example and you have a docker provided alias for the MQTT server.
- Organization Name : whatever
- Organizational Unit Name : whatever
- Locality Name : whatever, like a city
- State/Region/Province : whatever
- Country Code : 2 letter country code
- Email Address : your email address
- While it doesn’t hurt to properly fill this information it doesn’t really matter if you use this certificate only inside your system. If you plan to make it accessible to someone outside your system then fill it properly
- -days 1825 : this means that the Certification will be valid for 5 years before it expires. Note two things here:
- The Certification expires! If you don’t plan to disassemble garden furniture and light switches every X years make sure that you can update the certification checking mechanism on your clients remotely too.
- On certain devices there are limitations to the validity length of the certifications. For example on Apple products if the certification is longer than 825 days then it won’t be accepted.
- -out signedcert.crt : this is the file that will contain your generated Certification.
Check the results
Now that you have your very own signed TLS Certificate you can check its content.
Using openSSL the following line shows you the certification’s content:
openssl x509 -text -noout -in signedcert.crt
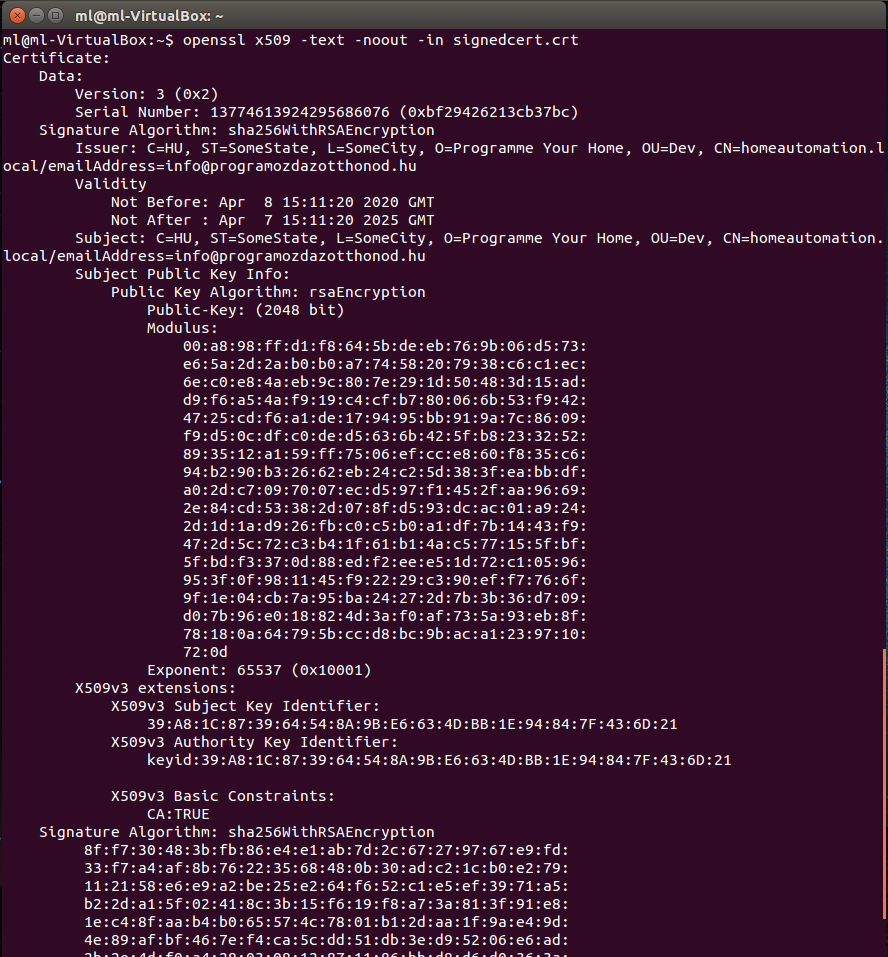
In windows simply doubleclick the cert file and check the content. Windows will warn you that it cannot be trusted because it is not signed by a trusted authority but that’s just fine as we know we signed it for ourselves.
Some cases you need to use openssl to simply encrypt files or convert between key formats. More detailed information can be found here: https://www.digitalocean.com/community/tutorials/openssl-essentials-working-with-ssl-certificates-private-keys-and-csrs
In upcoming posts we will learn how you can use a Certification within Homeassistant, NodeRED and what are the considerations when using with small devices like an ESP8266.
Appendix
Use the following code to create your own CA as well
openssl genrsa -des3 -out ca.key 2048
openssl genrsa -out server.key 2048
openssl req -new -out server.csr -key server.key
openssl x509 -req -in server.csr -CA ca.crt -CAkey ca.key -CAcreateserial -out server.crt -days 360

#based on http://www.steves-internet-guide.com/mosquitto-tls/